![]()
Survive First-Aid Pocket Handbook
This book has been developed as a pocket reference for those that have completed a course with Survive First Aid Pty Ltd.
First Aid Courses should be refreshed every 3 years, with CPR, Asthma and Anaphylaxis training refreshed annually.
Content/Guidelines have been sourced from the list of providers on the Home page of this app.
Contents
- Abbreviations
- First-Aid Aims and Principles
- Observations & Vital Signs Ranges
- I.M.I.S.T A.M.B.O
- Level of Consciousness (LOC) AVPU
- Heart Rate (HR)/Pulse
- Respiratory Rate (RR)
- Skin Color: Temperature: Moisture, (SCTM)
- Pupils
- Total Body Exam (Head to Toe)
- Enquire (SAMPLE history)
- Calling Emergency Services
- International Phonetic Alphabet
- Two-way Radio Guide
- Triage
- Choking
- Anaphylaxis
- Asthma
- Pressure Immobilisation
- Heart Attack
- Stroke
- Burns
- Heat Stress / Hyperthermia
- Hypothermia
- Helicopter Evacuation Guidelines
- Evacuation Guidelines
- N.O.T.E.S Form
Abbreviations
| Abbreviation | Definition |
|---|---|
| A | Absence of |
| AMS | Acute Mountain Sickness |
| Angio | Vessel |
| Anterior | From |
| Anti | Against |
| Arterio | Artery |
| Bi | Two |
| BLS | Basic Life Support |
| B.O.M | Bites, Odors, Medi-Alerts |
| BP | Blood Pressure |
| Brady | Slow |
| BSI | Body Substance Isolation |
| cap | Capsule of Medicine |
| Cardio | Heart |
| CC | Chief Compliant |
| cm | Centimeters |
| CO | Carbon Monoxide |
| CPR | Cardio Pulmonary Resuscitation |
| Crani | Skull |
| CSMS | Circulation, Sensation, Motion & Strength |
| Derm | Skin |
| Distal | Away from the body |
| Dys | Difficult |
| Ectomy | Removal |
| Encephalo | Brain |
| Entero | Intestine |
| g | Grams |
| Gastro | Stomach |
| HACE | High Altitude Cerebral Edema |
| Haemo | Blood |
| HAPE | High Altitude Pulmonary Edema |
| Hemi | Half |
| Hepato | Liver |
| HPI | History of Present Illness |
| HR | Heart Rate |
| Hyper | High |
| Hypo | Low |
| ICP | Intra-cranial Pressure |
| IM | Intramuscular |
| Inferior | Lower |
| Itis | Inflammation |
| IV | Intravenous |
| L/min | Litres per minute |
| LLF | Look Listen Feel |
| Lateral | Side |
| Lingual | Tongue |
| LLS | Lake Lousie Score |
| LOC | Level of Consciousness |
| m | Meters |
| Medial | Middle |
| mg | Milligrams |
| MI | Myocardial Infarction |
| min | Minutes |
| MOI | Mechanism of Injury |
| Myo | Muscle |
| Neuro | Nerve |
| NSAID | Non Steroidal Anti- inflammatory Drug |
| Ologist | Specialist |
| ORS | Oral Rehydration Solution |
| Ostomy | Opening |
| OTC | Over the counter |
| Oxia | Oxygen |
| PEARL | Pupils, Equal & Reactive to Light |
| Pedi | Children |
| Pnea | B - Normal Breathing? |
| Pneumo | Air |
| Poly | Many |
| Post | After |
| Posterior | Back |
| Pre | Before |
| Prone | Lying on front |
| Proximal | Closer to the body |
| Psych | Mind |
| Retro | Behind |
| RICE | Rest Ice Compression Elevation |
| ROM | Range of Motion |
| RR | Respiratort Rate |
| S/S | Signs and Symptoms |
| SC | Sub Cutaneous (Under the Skin) |
| Scleros | Hardening |
| Scopy | look at or into |
| SOB | Shortness of Breath |
| Superior | Upper |
| Supine | Lying on back |
| tab | Tablet |
| Tachy | Fast |
| tbs | Teaspoon |
| tbsp | Tablespoon |
| Thorax | Chest |
| TM | Trademark |
| TX | Treatment |
| Uni | One |
| Uria | Urine |
| Vasc | Vessel |
| Viscera | Internal organs |
First-Aid Aims and Principles
First Aid is the care given to an injured or Ill person before medical assistance arrives or is sourced. Whilst administering any First Aid it is important the following aims are adhered too:
- Maintain Life
- Protect the Unconscious
- Prevent the Condition Getting Worse
- Promote Recovery
- Seek Medical Assistance
- And Above all DO NO HARM!
Whilst administering First Aid it can be very difficult to recognize the variety of illness or injuries and therefore decide what appropriate treatment to administer.
It is important First Aiders adhere to a system and structure provided through training and then provide care to a patient based on a Patients, Signs (what you see or hear), Symptoms (what a patient feels or tells you) and Medical History (what happened and what pertinent history there is). Throughout First Aid it is imperative that you treat a patient with care and reassurance as this will undoubtedly help the situation and improve the chance that the patient will respond to treatment.
Primary Survey
When first initiating First Aid it is important to undertake the Primary Survey in the appropriate order of DRSABCD and to follow the Emergency Response Plan.
EMERGENCY ACTION PLAN
Unconscious Patient

R - Responsive?
S - Send for Help
A - Open Airway
B - Normal Breathing?
C - Start CPR
D - Defibrillator & Deadly Bleeds
Check for dangers to:
- Self
- Bystanders
- Patient
Questions:
- What are some specialised dangers we need to consider when working in a remote or wilderness environment?
- What should we do if the dangers to ourselves is too much?
R - Responsive?
S - Send for Help
A - Open Airway
B - Normal Breathing?
C - Start CPR
D - Defibrillator & Deadly Bleeds
The AVPU Scale
- ALERT: person, place, time, event
- VERBAL: R - Responsive? to a verbal command? (eg: squeeze my hand)
- PAIN: R - Responsive? to a painful stimuli? (eg: trapezius squeeze)
- UNRESPONSIVE: no R - Responsive? to any of the above

R - Responsive?
S - Send for Help
A - Open Airway
B - Normal Breathing?
C - Start CPR
D - Defibrillator & Deadly Bleeds
- Call 000
H.E.L.P
Make sure that you have the following information ready before you call:
- Hazards
- Emergency type
- Location
- Patient details

R - Responsive?
S - Send for Help
A - Open Airway
B - Normal Breathing?
C - Start CPR
D - Defibrillator & Deadly Bleeds
Make sure that the airway is:
- Open
- Clear
Use the Head Tilt and Chin Lift technique
Remember: Airway always trumps spinal!

R - Responsive?
S - Send for Help
A - Open Airway
B - Normal Breathing?
C - Start CPR
D - Defibrillator & Deadly Bleeds
Make sure that the breathing is:
- Normal
- Equal
Look, Listen and Feel for 10 seconds
R - Responsive?
S - Send for Help
A - Open Airway
B - Normal Breathing?
C - Start CPR
D - Defibrillator & Deadly Bleeds
Ensure that you consider the following:
- Is the surface suitable for CPR?
- Is my hand and body position correct?
- Am I compressing 1⁄3 of chest depth?
- Is my timing correct?
- Are my rescue breaths effective?
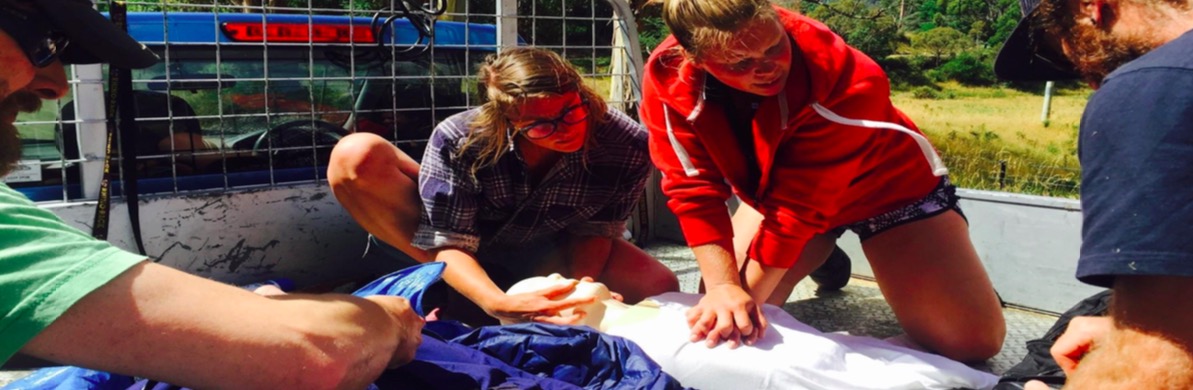
30 COMPRESSIONS : 2 BREATHS 5 CYCLES : 2 MINUTES 100 BEATS PER MINUTE
HANDS-ONLY CPR IS OK!!
R - Responsive?
S - Send for Help
A - Open Airway
B - Normal Breathing?
C - Start CPR
D - Defibrillator & Deadly Bleeds
ATTACH DEFIB ASAP
Make sure you consider:
- Do I need to dry or shave the patient?
- Am I putting the pads in the right place?
- Is the environment suitable?
STOP DEADLY BLEEDS ASAP
Make sure you remember:
- Direct pressure on the wound
- Positional pressure on the limb
- Do I need to use a torniquet?
EMERGENCY ACTION PLAN
Conscious Patient
R - Responsive?
S - Send for Help
A - Open Airway
B - Normal Breathing?
C - Start CPR
D - Defibrillator & Deadly Bleeds
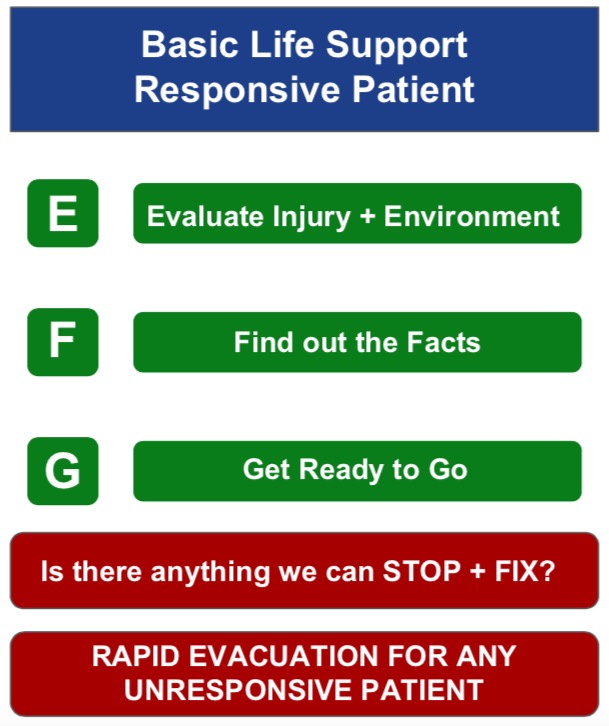
E - Evaluate Injury & Environment
F - Find out the Facts
G - Get Ready to Go
Evaluate Injury & Environment
- Treat life threatening injuries and illness
- Asthma, anaphylaxis, hypoglycaemia etc.
- Treat distracting injuries
- Long-bone fractures, burns,
- Treat for environment
- Remove wet clothing, hypo-wrap etc.

R - Responsive?
S - Send for Help
A - Open Airway
B - Normal Breathing?
C - Start CPR
D - Defibrillator & Deadly Bleeds
E - Evaluate Injury & Environment
F - Find out the Facts
G - Get Ready to Go
Find out the Facts
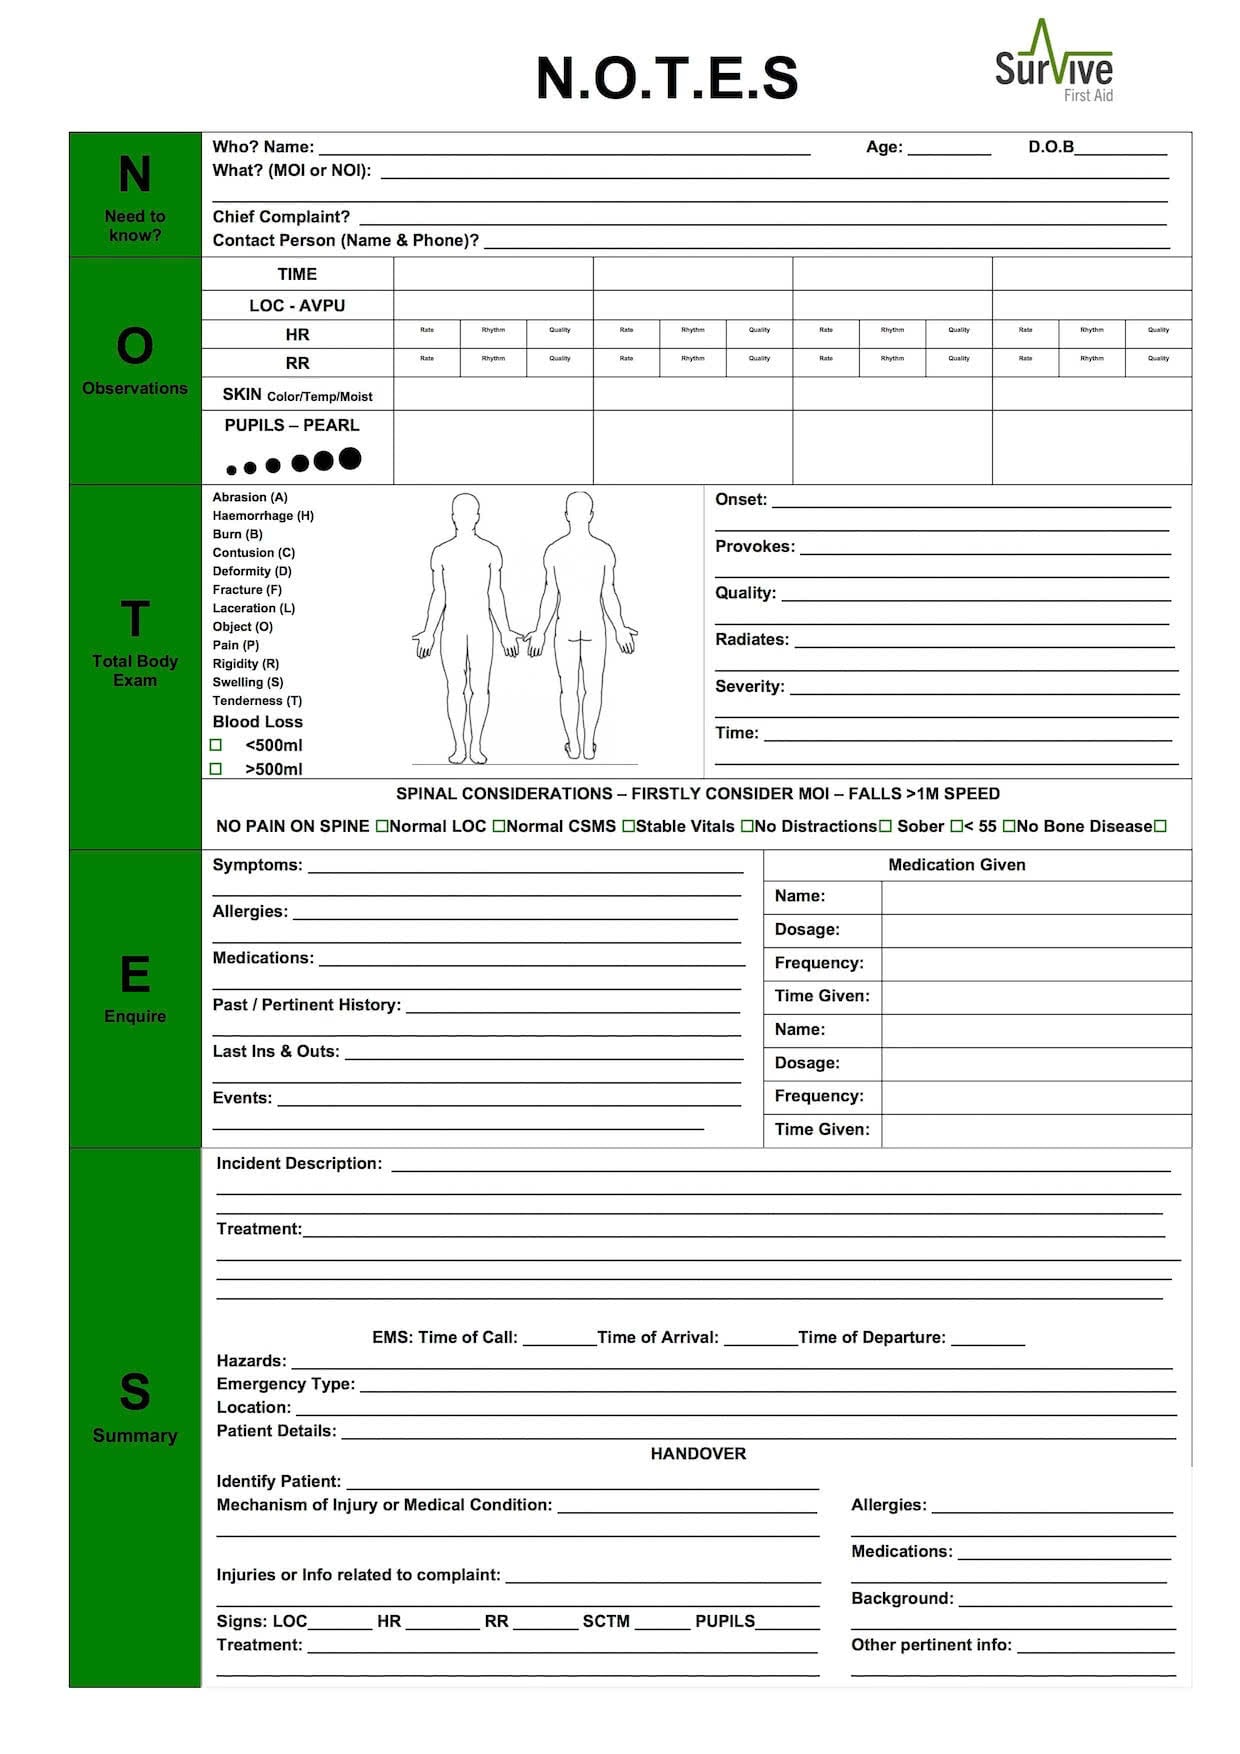
- Follow the N.O.T.E.S sheet format:
- Need to know?
- Observations
- Total Body Exam
- Enquire
- Summary + Spinal Assess
Remember:
- Record vital signs at regular intervals
- Get “down to skin” in total body exam
- Ask plenty of questions!
R - Responsive?
S - Send for Help
A - Open Airway
B - Normal Breathing?
C - Start CPR
D - Defibrillator & Deadly Bleeds
E - Evaluate Injury & Environment
F - Find out the Facts
G - Get Ready to Go
Get Ready to Go & Final Treatments
- Complete any treatments or packaging
- Prepare an IMIST AMBO handover
- Re-assess evacuation plans
- Make sure that all rescue team members are on the same page
- Smooth and steady movements- especially if lifting or carrying
Observations & Vital Signs Ranges
| VITAL SIGNS | NORMAL | MODERATE | SEVERE |
|---|---|---|---|
| LEVEL OF CONSCIOUSNESS | A+O x 4 | ALERT ONLY | V, P or U |
| HEART RATE | 60 - 100 | 100 - 120 | 120+ (without cause) |
| RESPIRATORY RATE | 8 - 16 | 16 - 22 | 22+ (without cause) |
| SKIN | Pink, warm, dry | Pale, cool, clammy | Pale, cold, blue |
| PUPILS | PEARL | Dilated/sluggish/pinpoint | Dilated/fixed |
| BLOOD SUGAR | 4 - 6 mmol | 2 - 4 mmol | Low |
I.M.I.S.T A.M.B.O
- Identify the patient
- Mechanism of injury/ nature of illness
- Injuries or info related to complaint
- Signs
- Treatment
- Allergies
- Medications
- Background
- Other pertinent info
Level of Consciousness (LOC) AVPU
Key to the AVPU Scale
- A&O x 4 - Patient knows Person, Place, Time and Event
- A&O x 3 - Patient knows Person, Place and Time
- A&O x 2 - Patient knows Person and Place
- A&O x 1 - Patient knows Person
- A - Patient responds but doesn’t know who they are
- V - Patient responds to a verbal stimulus
- P - Patient only responds to a Pain Stimulus
- U - Patient is Unresponsive
Heart Rate (HR)/Pulse
The rate of a normal pulse can vary greatly and be between 50 – 100 beats per minute for an adult and as much as 160 in an infant. Details of the HR can however tell you if a patient is stable over time and give you an indication of the extent of the injury/illness.
Note: It is best to take the Radial Pulse of a patient, as this is both less invasive for the patient and also important when assessing Blood Pressure.
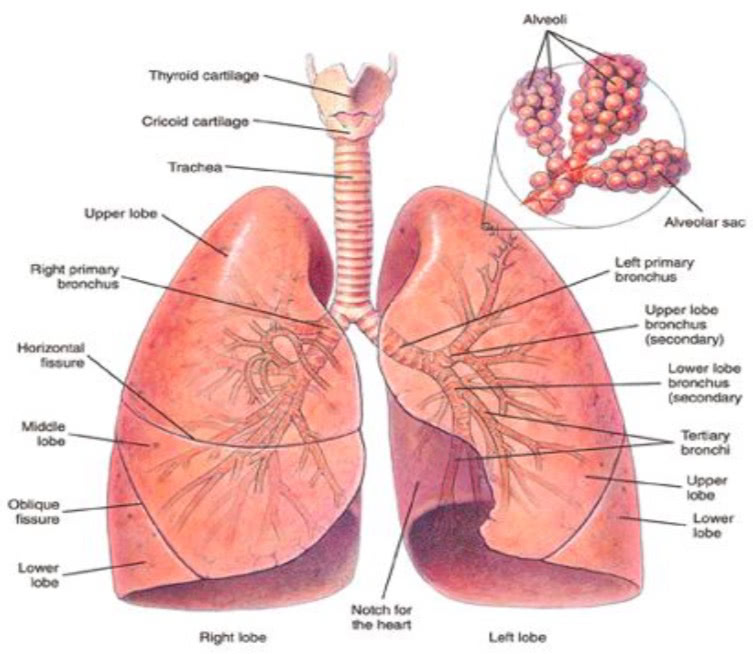
Respiratory Rate (RR)
In general it is effortless to breathe however if this becomes labored it is an indication that your patient has something wrong. The respiratory rate is best done by sight or feel of the chest rising and falling. As with the HR detail the Rate (Breaths per minute), Rhythm (Regular or Irregular) and Quality (Deep or Shallow).
Skin Color: Temperature: Moisture, (SCTM)
Every person irrespective of their ethnic/cultural background and genetics will have pink skin on the inside of their mouth, soles of feet and palms of hands.
Examples of SCTM:
- PWD - Pink, Warm & Dry - Normal
- PCC - Pale, Cool & Clammy - Shock
- RHD - Red, Hot & Dry - Hyperthermia
Pupils
Normal Pupils are equal in size, round in shape and have a normal reaction to light. They become smaller with increased light and larger with less light. This is described as PEARL, (Pupils, Equal and Reactive to Light). A patients Pupils can be tested by shining a torch briefly in each eye or use sun light by covering each eye and then exposing to the light again.
Anything that is different to PEARL should be noted, as it may be a significant discovery with regards to an injury or illness, i.e. Fixed, Dilated, Unequal.
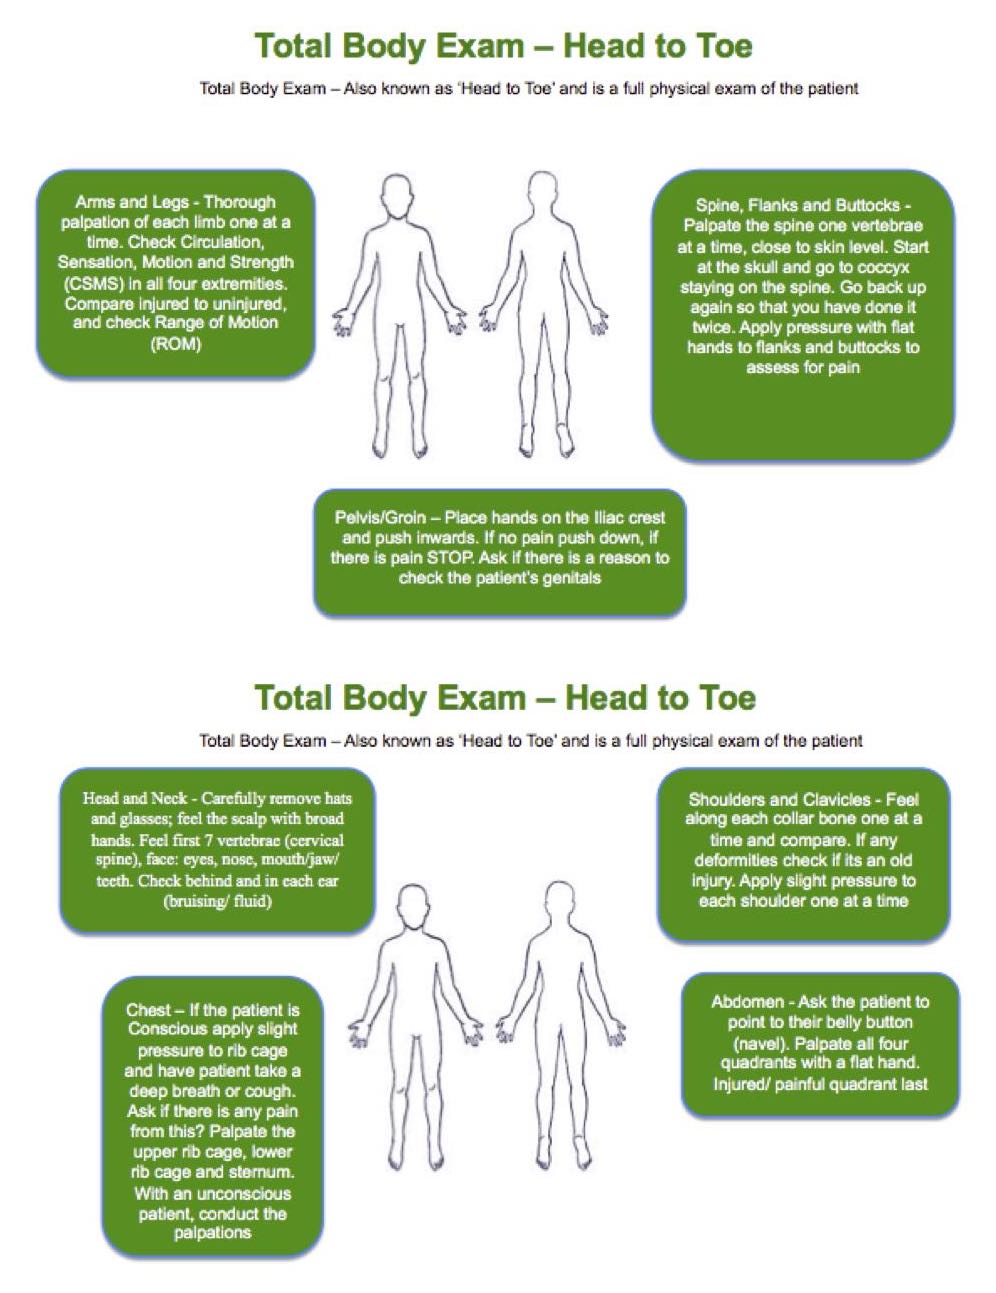
Total Body Exam (Head to Toe)
This is a systematic, physical check of the whole body for any injuries sustained. Whilst conducting this physical check, it is worth remembering to conduct a B.O.M check (Bites, Odors, Medi-alerts) and ensure you Look Ask and Feel (LAF) as you systematically move down the body. Look for bruising, bleeding, swelling, or anything out of the ordinary. Ask about pain or tenderness. Feel for deformities, unusual hardness or softness.
If you find a painful area ensure to expose it to skin level and examine before moving on. The objective of this ‘Exam” is to ensure you get a full picture of all the injuries that have been sustained.
Start at the head and work towards the feet using broad hands and explaining to the patient what you are doing at all times (even if the patient is unconscious)
If there is any pain or an injury with the neck, back or pelvis always suspect a spinal injury and treat accordingly. Ensure you check Circulation, Sensation, Motion and Strength (CSMS) in all four extremities. Please note that the Chief Complaint (CC) should already have been exposed and possibly treated in an earlier stage of your Emergency Action Plan (Evaluating Injury and Shock) prior to commencing this component of your secondary survey.
It is important during the Full Body Exam that you respect the individual’s cultural background and ensure that the exam is always undertaken with their permission. Continually talk to the patient during the exam explaining whet you are about to do and ensure they are comfortable and at ease.
Enquire (SAMPLE history)
A Sample medical history is an important part of the Secondary Survey and allows you to really investigate how the patient is feeling. Be compassionate and confident (good bedside manner), ask non-leading through questions, and record the information you receive. Again it is important to respect the cultural/ethnic background of your patient and ensure you speak to them in a respectful and appropriate manner.
- SYMPTOMS - How do you feel? Open ended Questions?
- ALLERGIES - What To? Severity of Reaction? Medication?
- MEDICATIONS - Prescription, Homeopathic, Illegal?
- PERTINENT MEDICAL HISTORY - What, When, Is it Related?
- LAST INS & OUTS - Urine, Faeces, Vomit, Diarrhea, Menstrual?
- EVENTS - What events occurred to make you feel like this?
Pain
- ONSET – Sudden or Gradual?
- PROVOKES – Movement, Touch?
- QUALITY – Dull or Sharp?
- RADIATES – Does the pain move?
- SEVERITY – Out of 10?
- TIME – How Long?
Calling Emergency Services
The person who calls emergency services should provide clear concise information to the operator. Other appropriate information to give to the operator would be the callers name, phone number or details and how to get back in contact.
When speaking to an operator you may need to spell words to ensure the information given is accurate. In such a case the use of the International Phonetic Alphabet will help
H.E.L.P
- Hazards– Detail any hazards emergency services attending need to be aware off.
- Emergency Type – Detail what has happened and what help you require
- Location - Detail exact location of where you are (nearest road head is often required)
- Patient Details – Describe what is going on with your Patient(s)
International Phonetic Alphabet
| LETTER | WORD | PRONUNCIATION |
|---|---|---|
| A | Alpha | Al fah |
| B | Bravo | Brah Voh |
| C | Charlie | Char Lee |
| D | Delta | Dell Tah |
| E | Echo | Eck Oh |
| F | Foxtrot | Foks Trot |
| G | Golf | Golf |
| H | Hotel | Hoh Tell |
| I | India | In Dee Ah |
| J | Juliet | Jew Lee Ett |
| K | Kilo | Key Loh |
| L | Lima | Lee Mah |
| M | Mike | Mike |
| N | November | No Vem Ber |
| O | Oscar | Oss Car |
| P | Papa | Pah Pah |
| Q | Quebec | Keh Beck |
| R | Romeo | Row Me Oh |
| S | Sierra | See Air Rah |
| T | Tango | Tang Go |
| U | Uniform | You Nee Form |
| V | Victor | Vick Tah |
| W | Whisky | Wiss Key |
| X | X-Ray | Ecks Ray |
| Y | Yankee | Yang Key |
| Z | Zulu | Zoo Loo |
Two-way Radio Guide
When using the Two-way Radio Network it is vital that you are clearly understood. To do this it is important to understand the differences between a telephone and a two-way radio. Two-way radios are not like a telephone. Telephones and mobile phones are "full-duplex" which means you can talk and listen at the same time. Two way radios are "simplex" which means you cannot hear anyone while you have the talk button pressed.
It is extremely important to take turns talking. To help with this, standard radio procedures have been created.
The single most important mistake people make is failing to identify themselves. There may be several people using the same channel as you, so it’s important to know who you are directing your transmission to. To call someone, say the name of the person you want to call, followed by the words "THIS IS," then say your name and "OVER."
Example: "Susan, THIS IS John, OVER.”
It's important to say the name of the person you want to contact before saying your name, as this will get their attention, and they will listen to the rest of your message. The word "OVER" leaves no doubt about whose turn it is to talk and avoids any confusion. It's important to say "OVER", so they know when you are done speaking.
It's basic "radio etiquette" to establish contact and make sure that you have the other person's attention before you start your message. If you hear someone calling you, acknowledge his or her call by saying, "GO AHEAD" or "STAND BY" This lets the caller know that you heard them. Also remember, it may take someone a while to get to their radio and respond. Be patient in waiting for a reply.
Because only one person can talk at a time, it is more important to LISTEN on a 2-way radio than to talk!
When your business is finished, the person who started the conversation should end it by saying their name and the word "OUT," which leaves no mistake that contact has ended.
Always release the push-to-talk (PTT) button whenever you stop talking. If you forget and keep it pushed down while you are trying to think of something to say, the radio continues to transmit, making your battery run down faster and making "dead air" so that nobody else can speak or be heard. In an emergency, it could prevent someone with vital information from getting through. If you need to collect your thoughts, release the PTT so that somebody else can break in case they have an emergency or additional information
It is always best to speak in short simple phrases on the radio and toss the conversion back and forth with the word "OVER."
Don't speak immediately when you press the PTT (push to talk), especially with digital radios which among all their benefits have slightly longer delay. Ideally, wait 2-3 seconds. If you speak as soon you press the PTT button, it can chop off your the first syllable or word, making you hard to understand.
Radio User’s Language
| Expression | Meaning |
|---|---|
| Go Ahead | Resume transmission |
| Say Again | Re-transmit your message |
| Stand-by | Transmission has been acknowledged, but I am unable to respond now |
| Roger | Message received and understood |
| Affirmative | Yes (avoid yup, nope, etc.) |
| Negative | No |
| Over | Transmission finished |
| Out | Communication is over and the channel is available for others. |
Sample Dialog
Below is a sample dialog that puts these standards to use.
Adam: Mike, this is Adam. Over.
Mike: Adam, this is Mike, Stand By. Over.
Mike: Adam, this is Mike, Go Ahead. Over.
Adam: Mike, there is a fire at 123 Main St. Over.
Mike: Adam, this is Mike, confirming a fire at 123 main St. The fire department will be notified. Over.
Adam: Mike, this is Adam, address is confirmed, thanks for the help. Over and Out.
Radio Usage Tips
- Be brief and to the point.
- Stay off the radio unless absolutely necessary.
- Engage your brain before your mouth.
- Think about how best to make yourself understood.
- Listen before you begin your transmission.
- Make sure the channel is clear. Wait a full second AFTER you push-to-talk and BEFORE you begin to speak. This will insure the beginning of your message is heard.
- Speak ACROSS the microphone rather than into it to improve intelligibility. Use a natural speaking voice. The only way to overcome loud ambient noise is to shield the microphone from the wind, point it away from the source of noise or wait until the noise passes.
- You should be aware that any portable radio is much less effective when worn on your belt, because your body absorbs the radio signal. This is very noticeable with low powered radios.
- DO NOT shout into the radio. It only distorts your transmission.
- DO NOT turn the volume all the way up. This drains the battery and causes distortion. It also has no effect on outgoing transmission quality.
Triage
Priority One – Red Tag (require immediate surgery or other life-saving intervention). Immediate resuscitation and stabilization required
- Control of severe bleeding required
- Open and stabilize airway in an unconscious casualty
Priority Two – Orange Tag (condition stable, but requires close monitoring and will need hospital care)
- Treatment but no active resuscitation required
- Burns, Crush injury, Spinal, Head, Chest, Abdominal
Priority Three – Green Tag (will require care but not immediately)
- Walking wounded
- Cuts, Grazes, Sprains, Closed Fractures
Priority Zero - Black Tag (deceased or in such life- threatening medical crisis that they are unlikely to survive given the care available)
- Decapitation
- Massive head or torso injuries
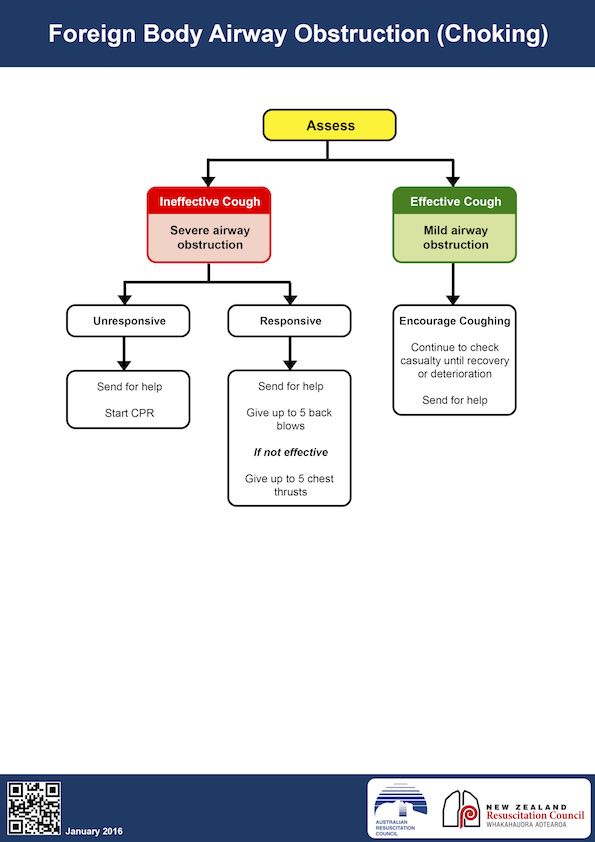
Choking
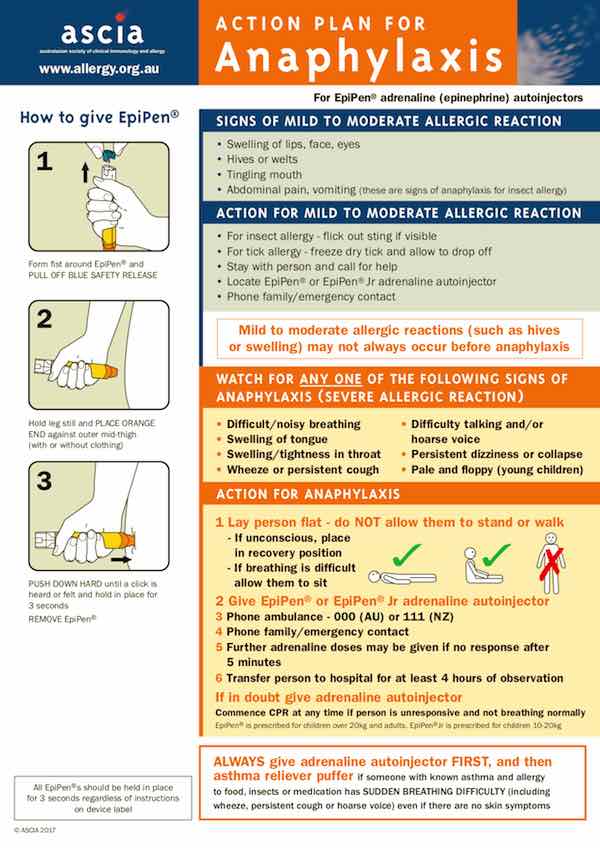
Anaphylaxis
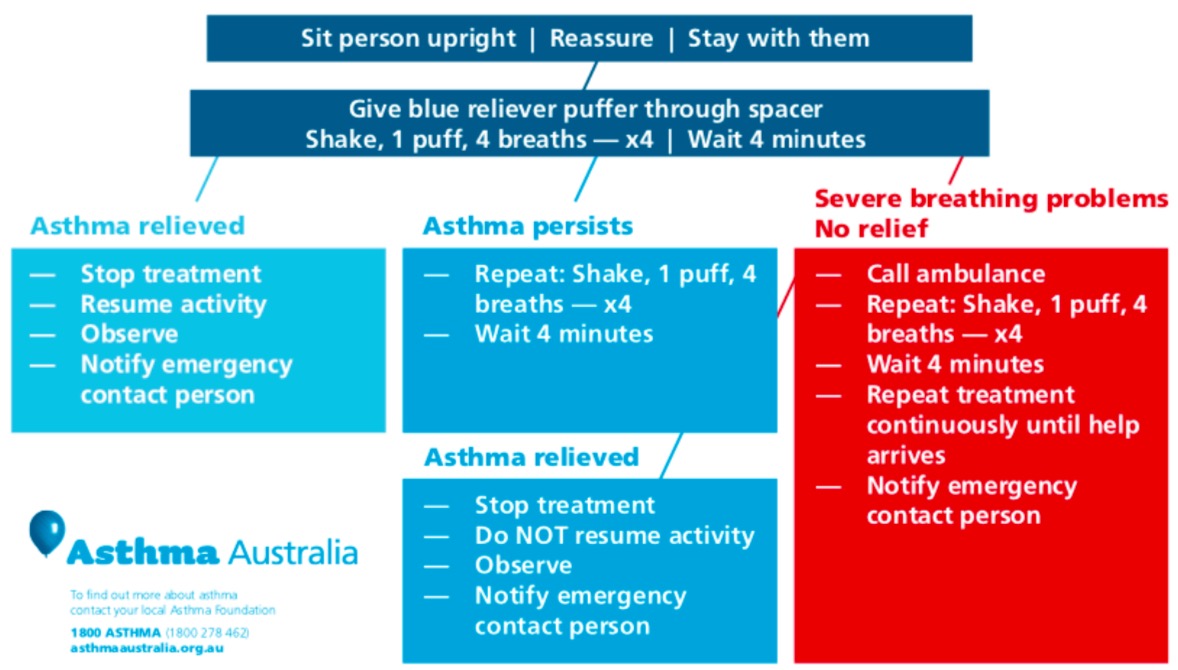
Asthma
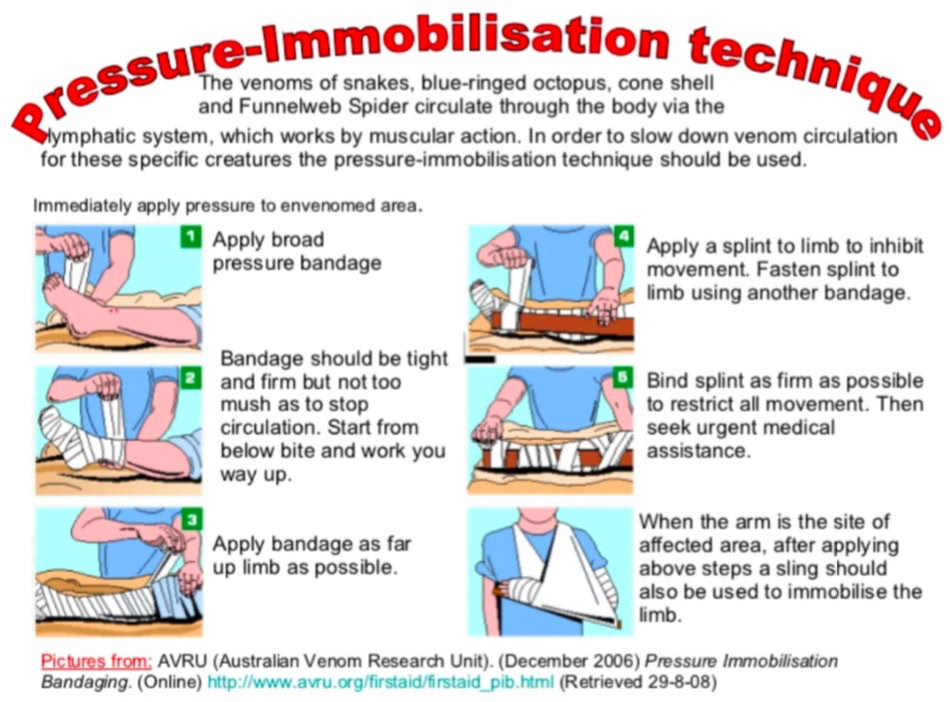
Pressure Immobilisation
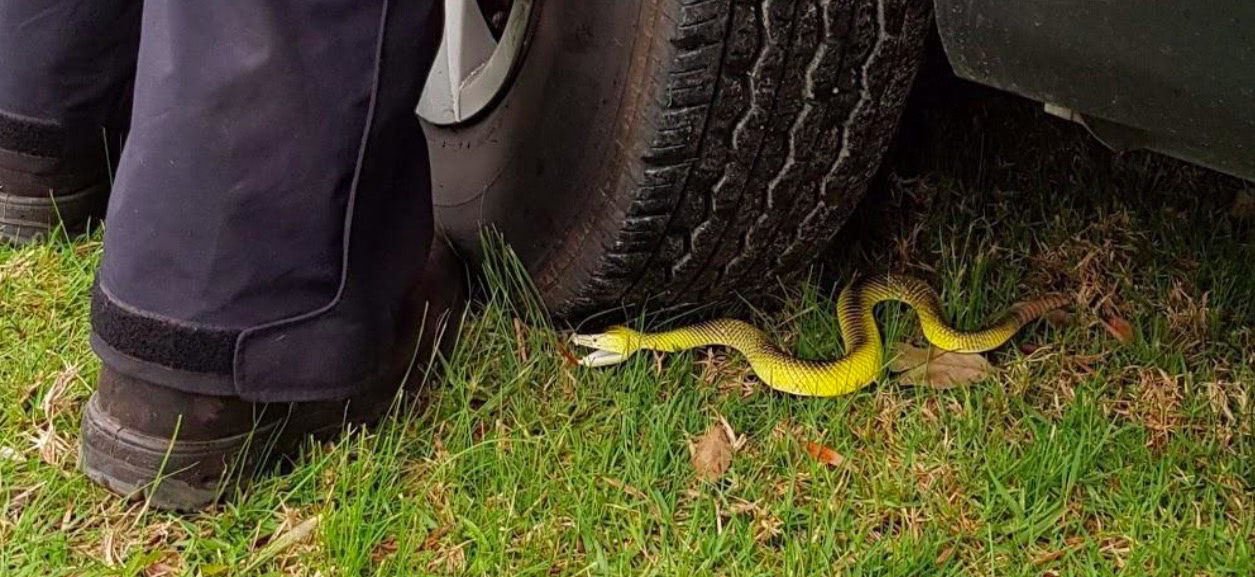
When treating a patient that requires a Pressure Immobilisation Bandage, there are two components that must be satisfied:
- pressure over the bitten limb, and
- general immobilisation.
This involves the application of:
- A broad (minimum 7.5 cm wide) elastic bandage to the entire bitten limb at a very firm pressure of at least 40 mmHg for an arm and 55 mmHg for a leg. The SMART Snake Bandage is perfect for this.
- Splints to effectively immobilize the entire limb, in combination with laying the patient down and completely still to minimize any movement.
TREATMENT:
- Keep the victim at rest, reassured and under constant observation
- Commence resuscitation if necessary, following ANZCOR Guideline 8: Cardiopulmonary Resuscitation
- Apply a Pressure Immobilisation Bandage to the entire limb:
- Apply a broad pressure bandage over the bite site as soon as possible
- The bandage should be firm and tight, you should be unable to easily slide a finger between the bandage and the skin
- To further restrict lymphatic flow and to assist in immobilisation of the limb, apply a further pressure bandage, commencing at the fingers or toes of the bitten limb and extending upward covering as much of the limb as possible.
- Splint the limb including joints on either side of the bite, to restrict limb movement.
- Rapid evacuation for any patient who requires a Pressure Immobilisation Bandage
DO NOT...
DO NOT cut or excise the bitten area, or attempt to suck venom from the bite site
DO NOT wash the bitten area
DO NOT apply an arterial tourniquet
DO NOT try to catch, chase or kill the snake, as this may lead to another bite
DO NOT give alcohol, tea, stimulants, food or medications without medical advice
DO NOT wash the wound, apply hot or cold packs, apply electric shocks, and
DO NOT suck the wound or use suction from any device
DO NOT allow the patient to walk or run after a snake bite
DO NOT remove or loosen the pressure immobilisation bandages unless advised to do so by medical personnel
DO NOT ignore the urgency of obtaining medical assistance in favour of reliance on traditional medicines or home remedies
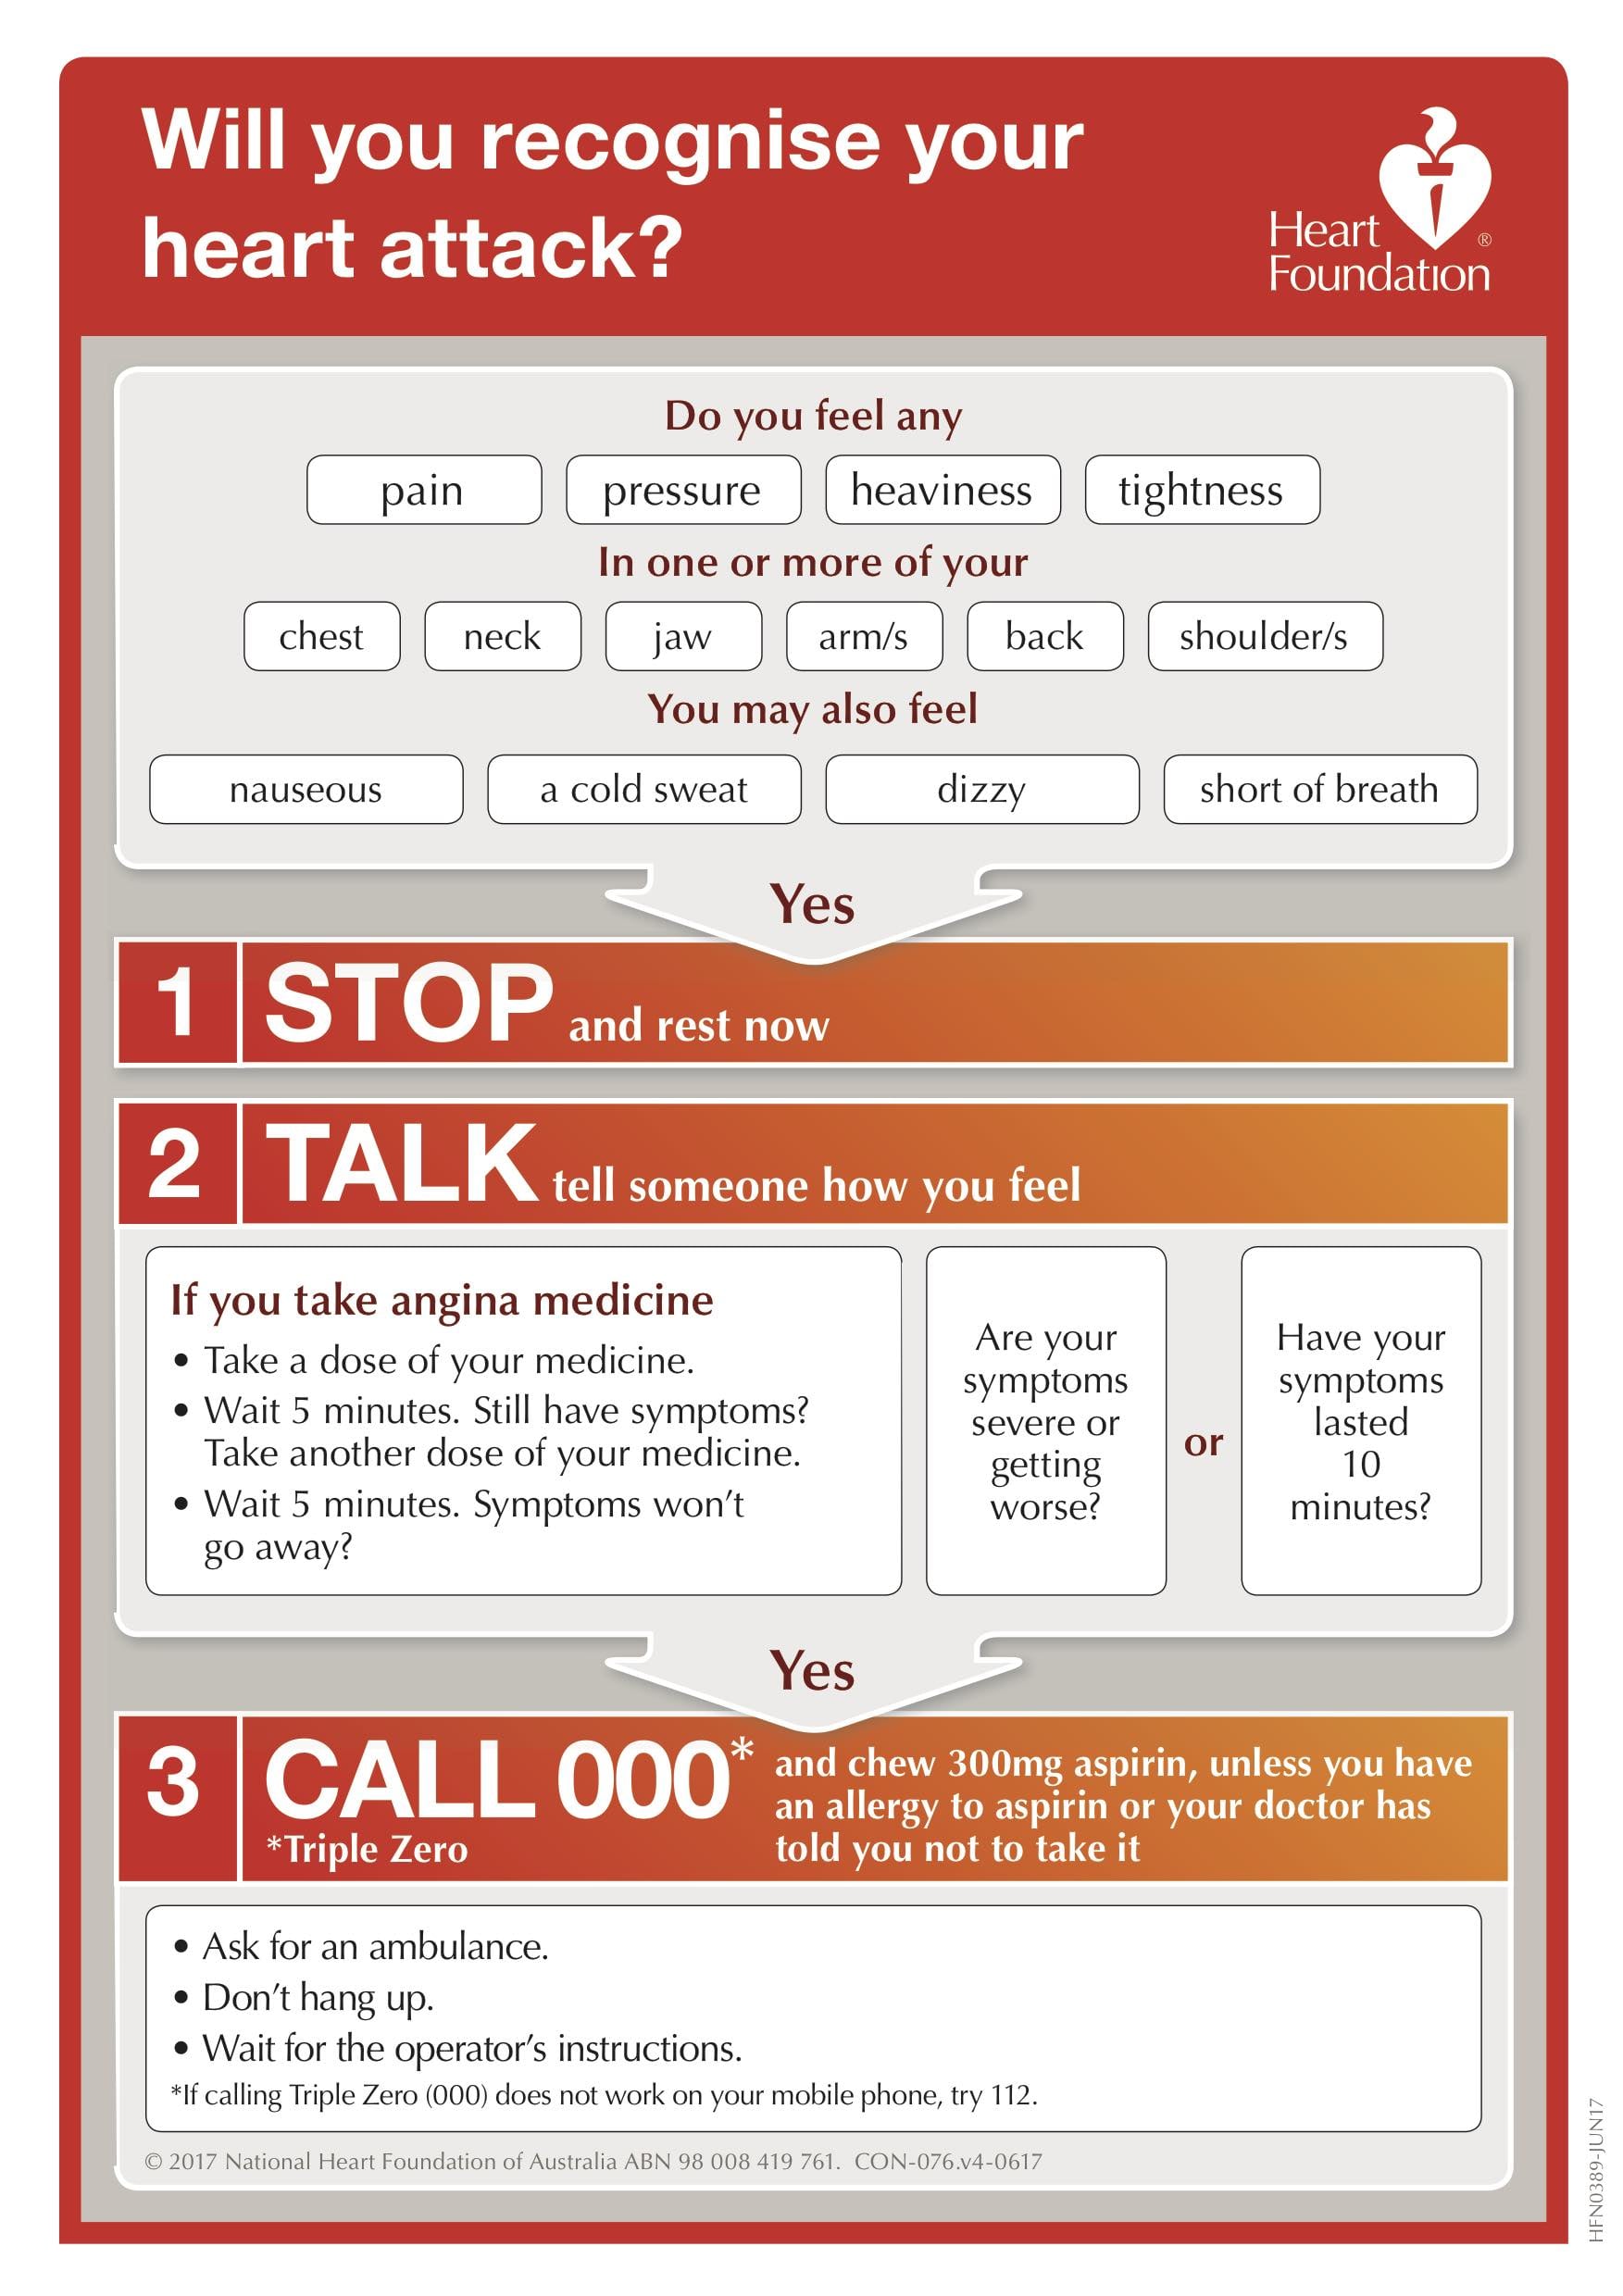
Heart Attack
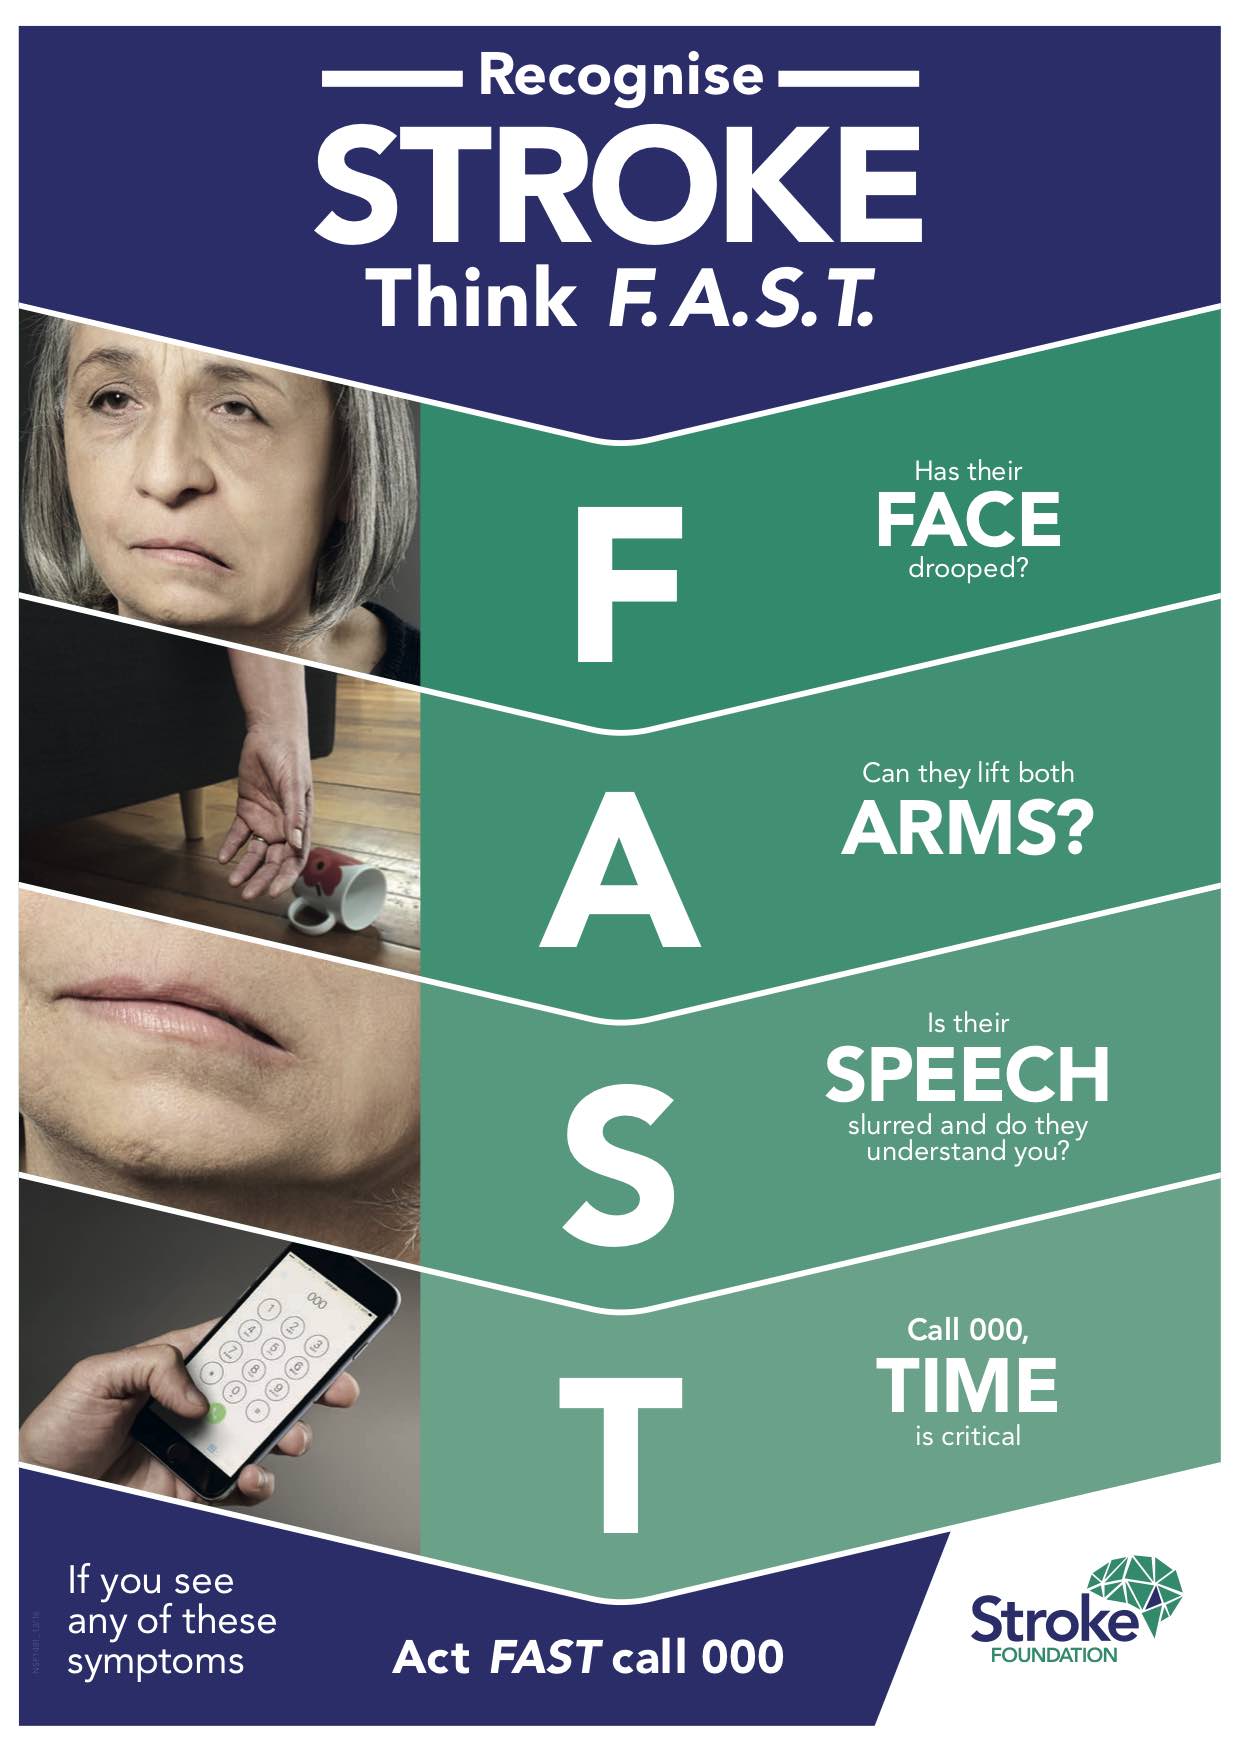
Stroke
Burns
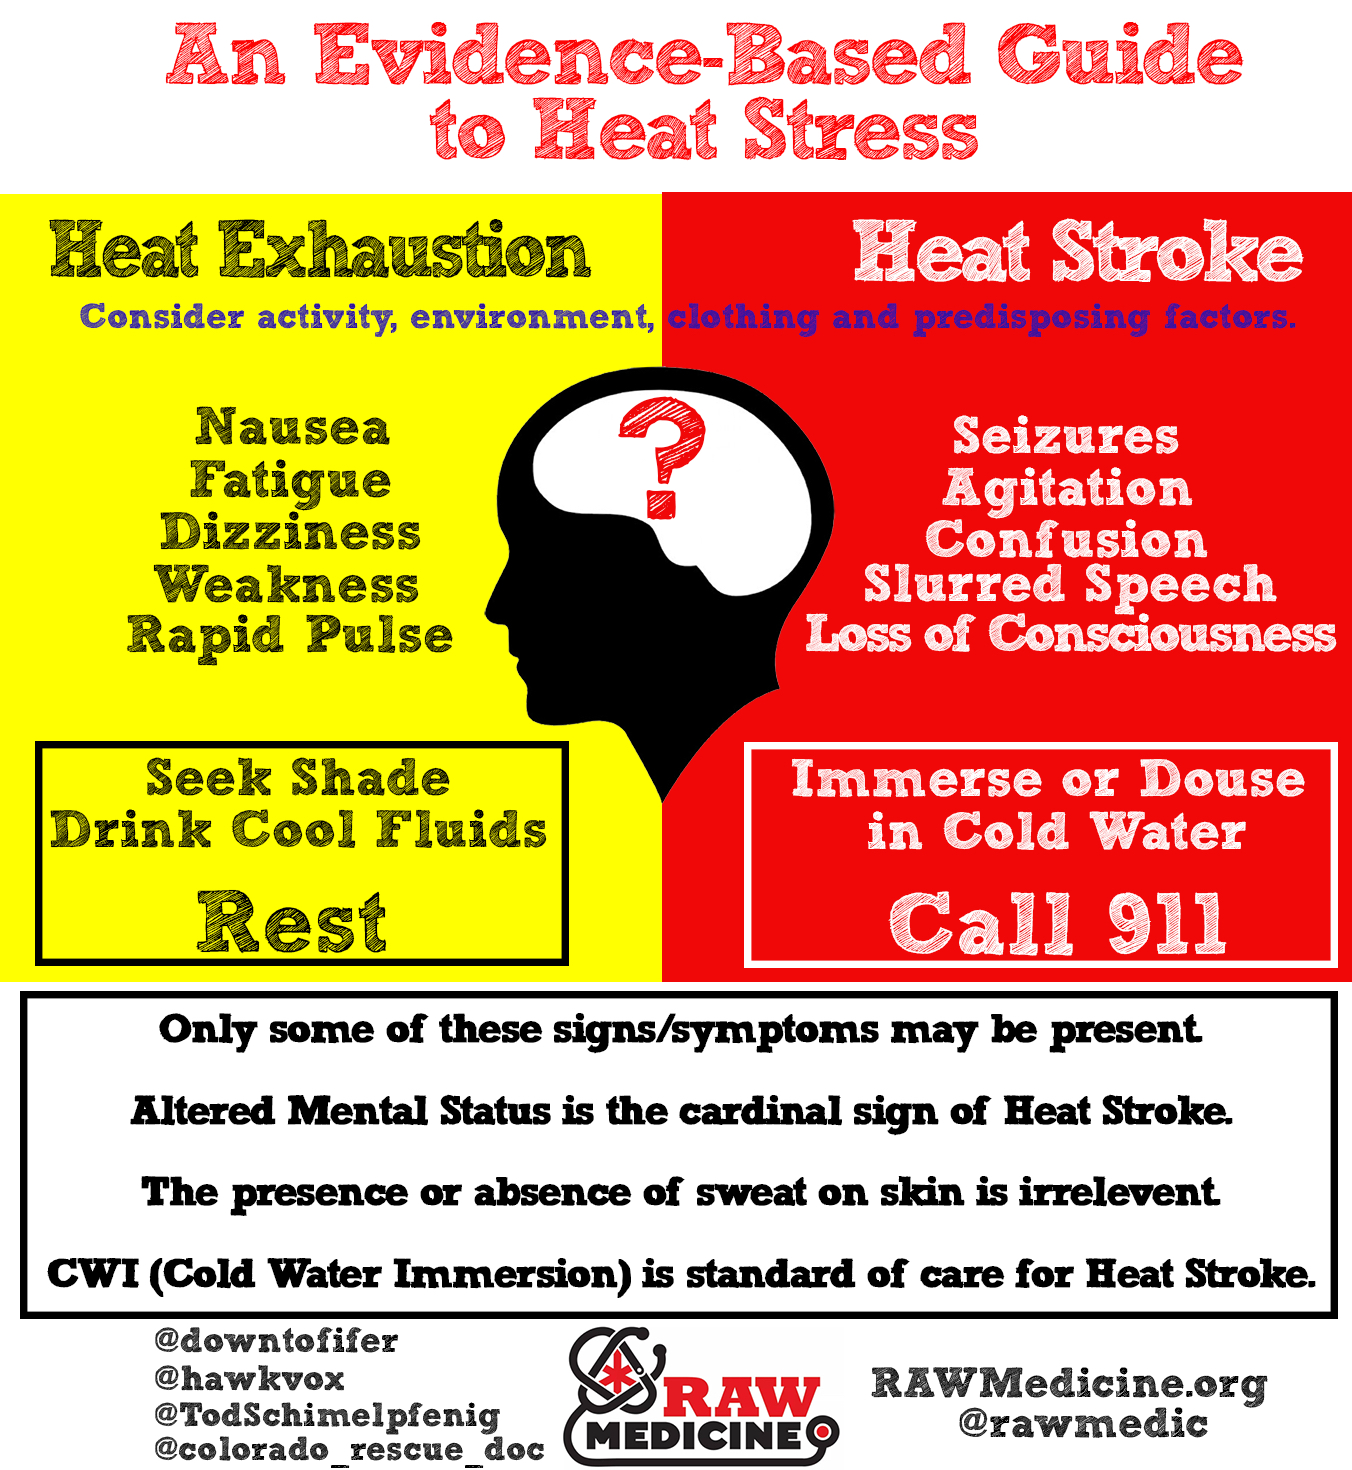
Heat Stress / Hyperthermia
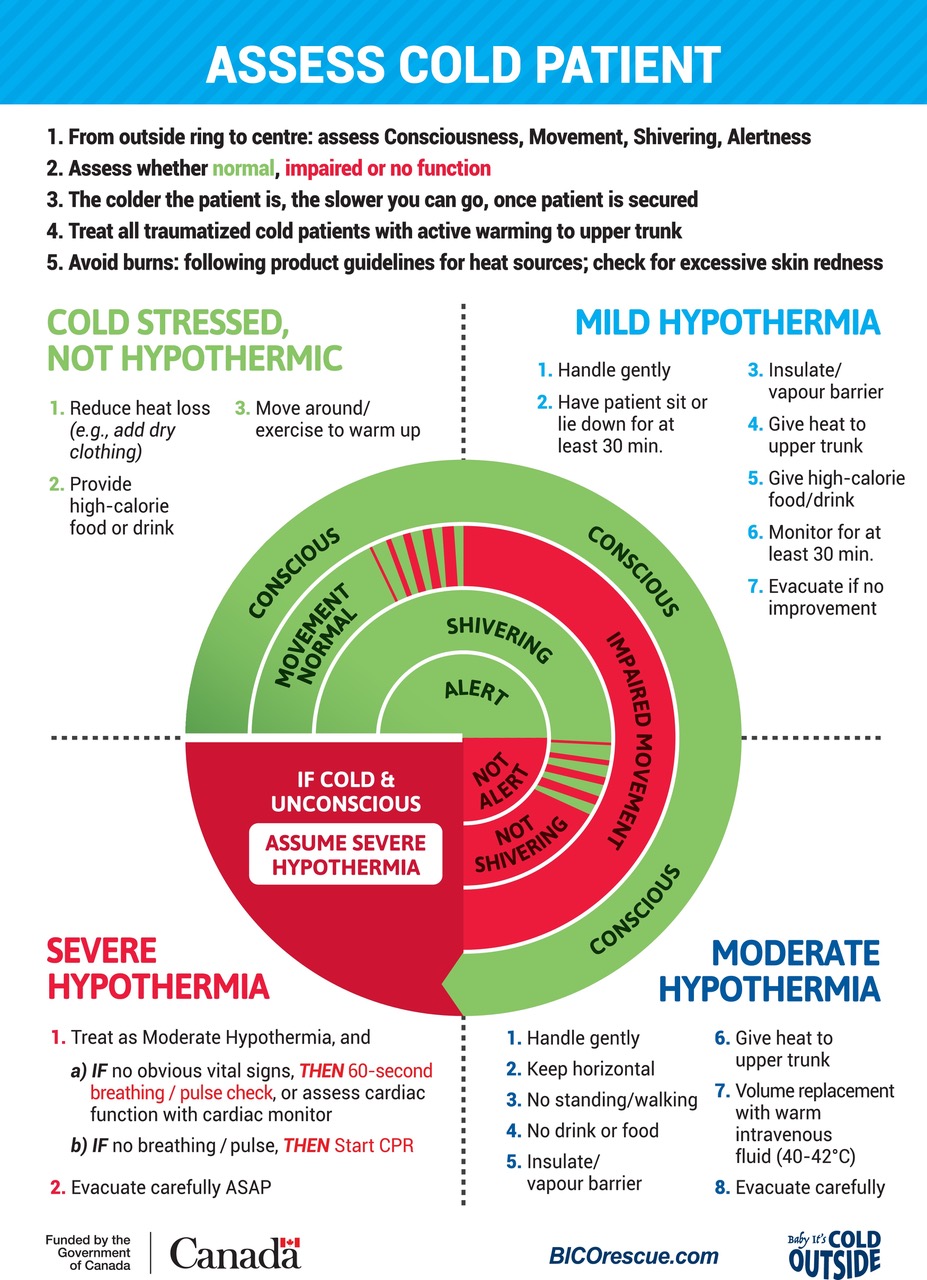
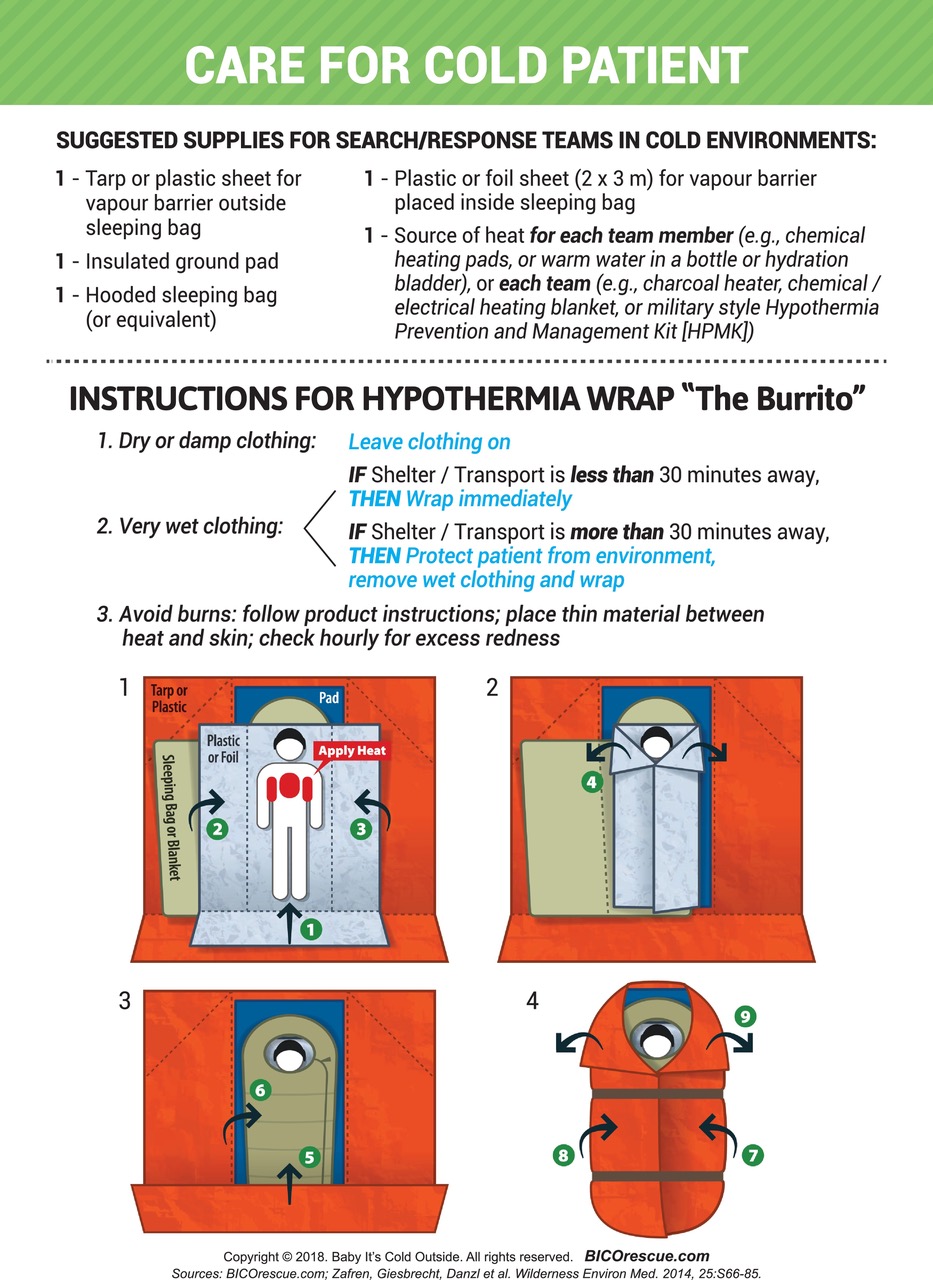
Hypothermia
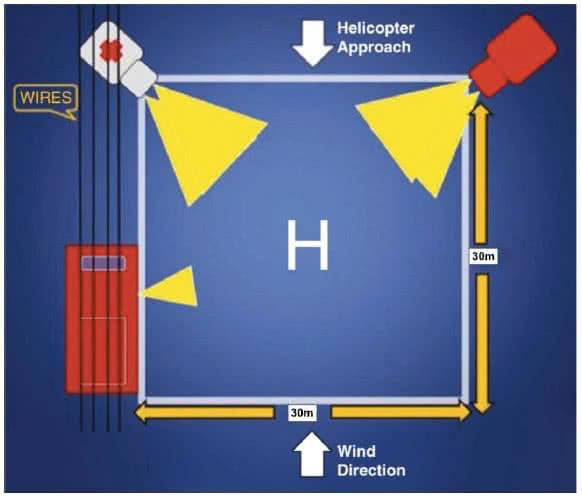
Helicopter Evacuation Guidelines
General Guidelines
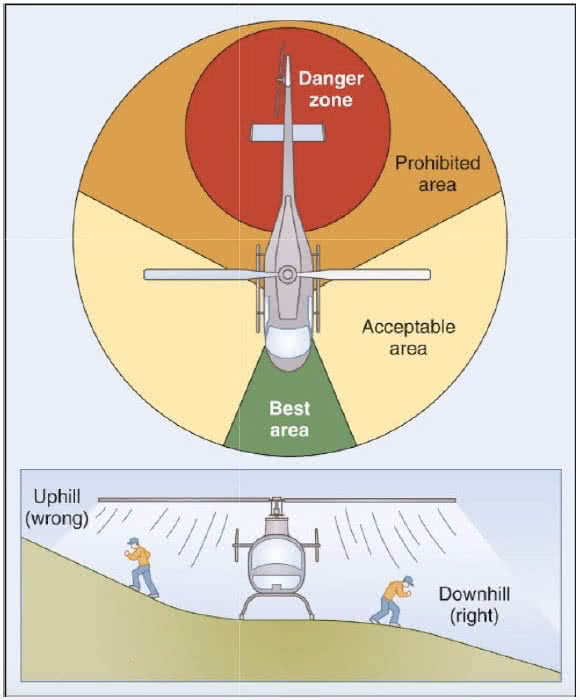
- Approach and depart helicopter from the front or forward-sides- ideally in the space defined by ‘10 + 2’ on a clock.
- Always establish visual contact with the pilot before approaching. If unsure, do not approach.
- Where possible, maintain radio communications with the pilot at all times.
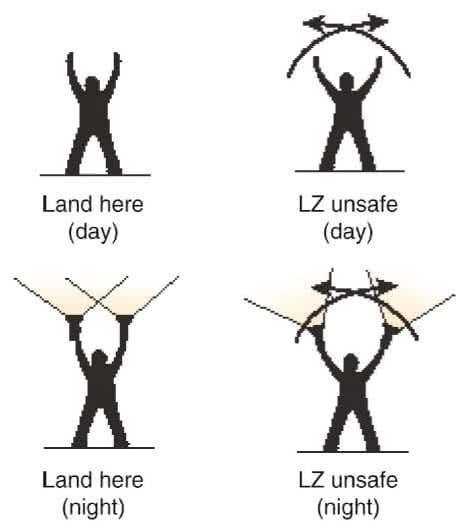
- When approaching at night, await a predetermined signal such as a the flashing of a head-torch or vehicle headlights.
- Never approach or depart toward the tail of the helicopter; always be aware of the tail rotor.
- Always approach and depart from the downhill slope (if present)
- Carry all equipment and patients below waist level.
- Secure all loose equipment on the ground (including wind-socks, lights and flares).
- Protect patients by using natural features or building a small fortress (using packs, bags, etc), between them and the aircraft.
- At night, designate the landing zone by crossing vehicle headlights or using head-torches in a similar manner.
- Small fires may be lit to designate landing zone corners, however must be well-controlled and attended at all times.
- Never shine lights or laser beams directly at the pilot.
- All non-essential lights should be extinguished.
- Always be aware that helicopters will approach and land from a downwind direction
Landing Zone Specifications
- Landing zones should, ideally, measure a 30m x 30m square, with minimal ground debris or overhead structures in the vicinity.
- The landing zone should be as flat as possible. In the case where flat land is not available, the slope should not exceed 5 degrees.
- A wind-sock should be placed on the upwind edge of the square, securely fastened. A small fire may serve this purpose.
- On a beach or similar surface, a large ‘H’ can be used to designate the middle of the landing zone.
- The landing zone must be kept free of personnel and debris at all times.

Evacuation Guidelines
- Please be aware that these are recommendations only.
- They are based on best-practice and the most current available information.
- Every first-aid scenario is dependent on responder training, patient presentation, environmental considerations and available resources- all of which should be taken into account and form part of your treatment and evacuation plan.
RAPID EVACUATION FOR ANY UNRESPONSIVE PATIENT
| PRESENTATION | CONSIDER EVACUATION | CONSIDER RAPID EVACUATION |
|---|---|---|
| Unresponsive- CPR | RAPID | Rapid evacuation for all unresponsive patients (including deteriorating LOC) and unstable vital signs |
| Unresponsive- Breathing | RAPID | Rapid evacuation for all unresponsive patients (including deteriorating LOC) and unstable vital signs |
| Spinal Injury | All patients with relevant MOI | All patients with relevant MOI and any signs and symptoms of spinal injury |
| Shock | All patients with injuries significant enough to cause uncontrolled shock | Deteriorating patients, uncontrollable bleeding, airway problems and unstable vital signs |
| Abdominal | Sudden unexplained onset of severe pain or constant unexplained pain lasting more than 24 hrs | Blood in urine, faeces or vomit; any acute abdo pain associated with women of childbearing age; any complications of pregnancy |
| Anaphylaxis | Any abnormal reaction or first time exposure with systemic involvement | Any patient who requires EpiPen administration |
| Asthma | Any persistent asthma event or where the trigger cannot be removed | Any asthma event unresponsive to salbutamol and/or any patient with underlying comorbidities (eg: chest infection) |
| Chest Pain | Any patient complaining of cardiac chest pain | If patient has no medication, has never experienced chest pain before or symptoms last more than 10 mins |
| Choking | Any patient requiring back blows/chest thrusts that doesn’t rapidly improve with clearing of the obstruction | Any patient who becomes unresponsive |
| Diabetes- HYPO | For known diabetics, monitor resolved hypoglycaemia for 24hrs (provided patient does not have compounding issues- eg: trauma). Consider evac for relapse or first-time presentations | If patient shows no signs of improvement, relapses, has altered level of consciousness (including persistent behavioural changes) or becomes unresponsive |
| Diabetes- HYPER | All T2/NIDDM patients experiencing hyperglycemia in a wilderness setting; monitor T1/IDDM regularly and consult/manage according to diabetes action plan | Altered level of consciousness, unresponsive |
| Seizures | For known epileptics, monitor resolved seizures for 24hrs (provided patient does not have compounding issues- eg: trauma). Consider evacuation for relapses | Seizures related to head injury, trauma, unknown causes or lasting longer than 5 mins. Evacuation for ALL first-time seizures |
| Stroke | RAPID | Any patient who ‘fails’ the F.A.S.T test |
| Bleeding- External | Controlled bleeding with associated unstable vital signs | Any patient requiring a tourniquet or haemostatic dressing |
| Bleeding- Internal | All patients with suspected internal bleeding | Immediate evacuation for internal bleeding with compromised vital signs |
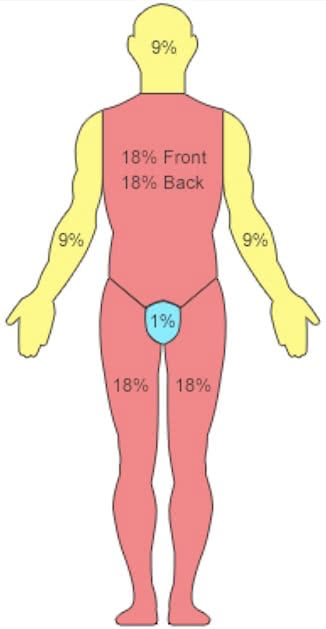
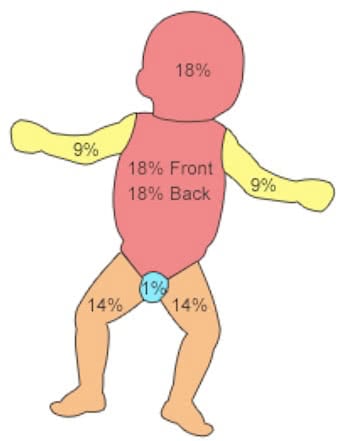
| Burns | Partial thickness burn greater than 10% of TBSA; Any full thickness burn | Major burns of the hand, face, feet or genitals; burns with inhalation injury; electrical burns; circumferential burns; burns to a medically ill patient |
| Blisters/ Minor Lacerations + Wounds | Related to patient comfort and logistical considerations- should be considered for any patient showing signs of localised infection | Any patient with signs of systemic infection |
| Head Injury | All patients who have a relevant MOI, changes in LOC caused by a head injury (including concussion) should be assessed by a health professional; Acute onset of unexplained headache | Any persistent decreased LOC or deterioration |
| Limb + Joint Injuries | Directly related to patient comfort and logistical considerations- should be considered for any patient with uncontrollable pain levels or persistent dislocation | Any patient with signs of distal hypoperfusion |
| Penetrating Injury | Any patient with a penetrating injury | Any patient with signs of shock or breathing problems as a result of injury |
| Bites and Stings | Directly related to patient comfort and logistical considerations- should be considered for any patient with uncontrollable pain | Any patient with systemic effects, breathing or circulatory problems. Any patient who requires a Pressure Immobilisation Bandage |
| Hypothermia | Any patient that doesn’t respond to rewarming interventions | Persistent moderate/ severe patients |
| Hyperthermia | Any patients that don’t respond to cooling interventions | Altered LOC or seizing patients |
| Hyponatraemia | Any patients that don’t respond to cooling interventions | Altered LOC or seizing patients |
| Lightning | RAPID | Anyone suspected of a lightning strike injury |
| Drowning | RAPID | Anyone suspected of a drowning episode |
| Altitude Emergencies | Descent for all patients showing persistent signs of AMS lasting longer than 24 hours | Rapid descent for all patients showing signs of advanced AMS (HAPE, HACE), breathing problems or decreased LOC |
| Diving Emergencies | RAPID | Pain or breathing issues after diving, any altered LOC, any complications of rapid ascent |
| Avalanche Emergencies | RAPID | Any patient that has required rescue (self or bystander) following an avalanche emergency (possible unknown internal injuries) |
| Mental Health | Patients who show a deteriorating level of mental health where responder intervention does not improve situation | Any patient at risk of harm to themselves or others; suicidal ideations; psychotic episodes |
N.O.T.E.S Form